Is Custom Color Matching Better Done on Pre-Built Gundams?
Many U.S. builders wonder: should Custom Gundam color matching happen on the runners, or after a full snap build? Colors look bold and clean on sprues. But, once assembled, they look different under real light.

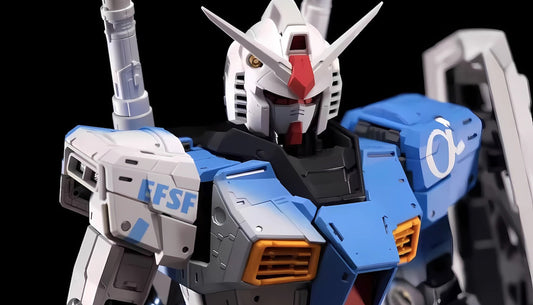
It can be tricky to match colors, even with careful building. You might place stickers and fix nub marks, but it's hard to get the sharp look from Bandai photos. Builder Dominic Lee points out the gap between what you build and what the art shows.
Most Gunpla kits are not pre-painted. They are colored through Bandai’s runners, meant for quick builds. But, this can hide the need for a unified custom color display.
For a display-ready gundam model, a full finishing plan is key. Panel lining, decals, topcoats, and repainting help parts look the same. Judging these choices is easier after a pre-built Gundam is assembled and seen as one piece.
Why box art accuracy is harder than it looks on a fresh kit
Box art sets a high bar. On a new kit, the plastic can look clean. Yet, it misses the sharp contrast and depth seen in promos. This gap is why many builders start with a pre-built gundam model or a pre-assembled gundam model before they chase a perfect match.

Even without paint, smart planning helps. You can spot where a professional gundam build needs extra steps to reach stronger gundam model finish quality and tighter gundam model detailing.
Pre-colored, not pre-painted: what Bandai injection-molded runners actually deliver
Bandai parts are molded in multiple colors. Some runners even carry more than one color through advanced injection molding. It’s impressive engineering, but it is just bare plastic, not a painted surface with controlled sheen.
On kits like the MG Gunleon, separation is strong enough to read close to the anime look. Orange, white, grey, and dark navy parts are split cleanly. MG Kyrios is another example where molded color blocking does a lot of the heavy lifting before any paint touches the kit.
Why stickers and clean nub removal don't fully match the "fine line" look of promotional art
Stickers can cover gaps in color, but they also add their own shine and edge thickness. Careful nub removal helps, yet small stress marks and texture changes can catch light in ways the box art never shows.
Dominic Lee has pointed out how promotional images lean on a “fine line” effect that makes shapes pop. On unpainted plastic, those lines often read softer, so panel breaks and vents can look flatter unless you push the contrast through gundam model detailing choices.
How molded color separation varies by grade (HG, RG, MG, PG, SD) and impacts repaint decisions
- HG: good separation for the price, but fine accents often rely on stickers.
- RG: advanced part breakdown and high surface detail, often with color-accurate inner frame elements.
- MG: excellent color accuracy plus deeper mechanical separation, with more frame and panel structure.
- PG: high complexity and phenomenal separation, with more room for layered finishes.
- SD: simpler builds with fewer parts, pre-colored but less segmented.
Painting stays optional, but it becomes strategic when you want better control of tone, hide cut marks, and unify sheen. Many builders decide after a quick pre-assembled gundam model test fit, because the assembled silhouette reveals which colors feel “off” in context.
That same dry build also guides masking lines and part handling, which supports a cleaner professional gundam build. Done well, it raises gundam model finish quality while keeping the kit’s original molded separation working in your favor.
Custom Gundam color matching, Pre-built Gundam model, Custom painted Gundam
Loose parts can trick your eye. A Pre-built Gundam model shows the full shape. This helps you judge how colors will look together on a shelf. It turns color matching into a real design challenge.
When armor is put on, big colors can look flat. Seeing the model assembled helps spot where details will make a difference. This planning helps avoid messy touch-ups later.

Pre-building lets you see colors together easily. You can check if colors clash or work well. This is key for a Custom painted Gundam, deciding what gets painted.
Colors can look different under different lights. Room light, display cases, and daylight can change how colors appear. Custom color matching shows how colors look in real life.
Testing fit before painting protects moving parts. Kits with sliding armor need careful planning. This avoids damage and keeps the build quality high.
- Pose the arms and legs to find rub points before primer.
- Mark seam lines and panel breaks that can hide masking edges.
- Dry-fit armor swaps to confirm clearances for a Custom painted Gundam.
Pre-built Gundam model workflows for cleaner paint planning
A pre-built gundam model makes it easy to see what needs paint and what doesn't. Before painting, clean up with nippers, a hobby knife, and sanding sticks. This helps avoid nub marks and makes customization easier.
Painting plans work best when the build is broken down with purpose. View the pre-assembled gundam model as separate paint-ready modules. This makes painting smoother and fit more predictable, which is key for sharp details.
Identifying subassemblies to keep joints moving
- Separate an arm from the forearm, and keep armor plates off the frame when possible.
- Mount each subassembly on barbeque sticks with Blu-Tack, then park them in a block of styrofoam to dry without fingerprints.
- Label left and right parts so the pre-assembled gundam model goes back together without mix-ups or scuffs.
This method ensures every surface gets paint, including edges. It also prevents paint bridges that can glue parts together after drying.
Why whole-limb painting backfires on complex grades
On higher grades, limbs have moving parts and panels that pop off. Painting a whole limb at once can cause damage and ruin customization.
Why painting on the sprue creates finish problems
Painting parts on the runner seems quick but leaves cut marks. These marks need touch-ups, which can mess up the finish. Clean and paint each piece separately for a uniform look.
Surface prep and paint compatibility that protect Gundam plastic and finish quality
Good surface prep is key to a lasting repaint. It keeps the model looking great, even when posed. This is essential for a collector gundam model.
Where paint wear happens most: joints and armor rub points during posing and handling
Paint usually chips at contact points, not on flat areas. Joints and moving parts are where it wears off. This can expose the plastic, ruining the finish.
To avoid this, treat these areas with care. Light sanding and test poses can prevent damage. This keeps the model looking new.
Primer and topcoat strategy for a display-ready Gundam model that survives handling
A display-ready model gets handled often. Primer helps paint stick and surfaces look even. A clear topcoat seals it, reducing shine and protecting the paint.
Choosing the right clear coat changes the model's look:
- Gloss for sharp decal edges and a shiny look
- Flat to reduce glare and make armor look realistic
- Pearl for a subtle shine that enhances the model
Keep clear coats thin to preserve details. Thick coats can damage fine lines and parts that move.
ABS caution: how some panel liners can make plastic brittle
ABS parts need special care, as some liners can weaken them. Test liners on hidden areas to avoid damage. This prevents cracks later on.
Choosing the right paint and liner is also important. Some markers can damage the paint. Seal the paint first, then line, and topcoat to protect the finish.
Detailing choices that make custom colors read “professional” on a collector Gundam model
Getting the colors right is key, but it's the finishing touches that really count. On a collector gundam model, we aim to make shapes clear from a distance. This ensures the model looks detailed without looking like a rough sketch.
Panel lining as contrast: using recessed details to break up “seas of color” on armor
Panel lining involves filling in the kit's recessed lines and vents with color. It's not just about drawing lines on plastic. It adds contrast, making big armor areas less overwhelming and small details stand out.
Done right, panel lining makes parts look denser. This makes edges, hatches, and layered panels appear as distinct parts. Even with tight, clean paint tones, they'll be clear.
Choosing panel line colors (grey on white, brown on warm colors, black on most) for realism
Choosing the right panel line color is as important as how you apply it. Use grey on white, brown on yellow and red, and black on most. These colors enhance realism, with black being the most common choice.
Think of panel line color as adding weathered shadows, not just ink. The right color makes armor look less harsh. It also helps your collector gundam model have crisp details around intakes and panel breaks.
Decals and sealing: using a gloss clear layer to support cleaner decal application and a cohesive finish
Decals are part of the finishing process, just like lining and clear coats. For a custom color gundam display, a smooth surface is key. It helps decals look like they're painted on, not stuck on.
- Apply a gloss varnish to create a smoother surface.
- Apply decals, then press out trapped air so edges disappear.
- Seal everything under a hard varnish coat for durability and an even finish.
Once sealed, everything shares the same sheen. This unity makes your collector gundam model look finished. It's perfect whether it's on a shelf or being handled for photos.
Panel liner options and when each method works on bare plastic vs painted builds
Panel lining sharpens edges and boosts detailing in gundam models. Dominic Lee suggests starting with the surface and choosing the safest tool for that finish. This approach also protects the model's finish when moving from snap-fit parts to a custom paint job.
For unpainted kits, Dominic Lee advises starting with Gundam Markers. For painted kits, he recommends washes and Tamiya Panel Line Accent Color. This is because some Gundam markers can melt paint and clog tips, which is a concern when matching custom colors.
- Bare plastic first: fine point, brush point, or flow type markers are the usual picks.
- Painted surfaces first: brush point markers or controlled washes tend to be safer; enamel-style products require the right prep.
- Risk tolerance: the hotter the solvent, the more careful you need to be for a professional gundam build.
Fine point markers: easiest for bare plastic and quick cleanup
Fine Point Gundam Marker is great for engraved lines on bare plastic. You draw right into the groove, then clean the overflow with an eraser, cloth, cotton swab, or even your thumb, as Dominic Lee describes. It is fast and does not require mixing.
For a natural look, Lee’s guidance holds up: grey reads best on white armor, brown works well on warm tones, and black fits most colors when you want stronger contrast. Used with restraint, this supports custom gundam color matching instead of overpowering it.
Brush point markers: better reach and more tolerance on painted surfaces
Brush Point Gundam Marker uses a brush tip that reaches corners, vents, and tight panel breaks. Dominic Lee points out that it needs less force in cleanup and is more tolerable on painted surfaces, with less chance of quickly melting the paint layer. That makes it a practical option when you are protecting a custom painted gundam finish.
Color options are typically black and grey, which covers most gundam model detailing needs. It also fits builders chasing consistent line weight across armor plates, which supports a cleaner professional gundam build.
Flow type markers: capillary action without the same plastic-damage worries as enamel washes
Flow Type Gundam Marker works by pressing the tip to a line and letting ink move through capillary action. Dominic Lee calls it more user-friendly than enamel options because the ink “does not destroy the plastic.” It is a strong match for bare plastic when you want fast coverage across long grooves.
Cleanup is more resilient than it looks; Lee recommends an eraser, and a marker eraser can work with care. Too much scrubbing can start to fade the line, which can dull gundam model finish quality on high-contrast color blocks.
Washes and Tamiya Panel Line Accent Color: why enamel-based products need the right surface prep
Washes are extremely thinned paint. Dominic Lee describes applying them like a flow liner with a brush, or even dunking parts and wiping back for speed. The catch is compatibility: the “right” wash depends on your paint and thinner system, so testing on a spare part is part of steady custom gundam color matching.
Tamiya Panel Line Accent Color is enamel paint heavily thinned with enamel thinner. Lee notes that enamel thinner can eat through plastic, so it is not recommended on bare plastic. Cleanup is usually a small amount of enamel thinner on a cotton swab, used with a light touch so you do not cut into the base coat.
- Operational fit from Dominic Lee’s guidance: Fine Type works on bare plastic, but not on painted acrylic/enamel or lacquer. Brush Point works on bare plastic and painted acrylic/enamel, and it also works on lacquer. Flow Type works on bare plastic, but not on painted acrylic/enamel or lacquer.
- Washes: depends on the paint and thinner pairing.
- Tamiya Panel Line Accent Color: not for bare plastic, not for painted acrylic/enamel, and suited for lacquer with proper prep.
How pre-building improves gundam model finish quality and custom gundam build quality
A pre-built gundam model helps spot small issues before they become big problems. Dry-fitting parts lets you see how light hits edges and where contrast is needed. This step is key for a better finish and smoother customization.
Spotting seam lines, stress points, and scrape zones before paint makes fixes harder
Seams and pressure marks often hide until the kit is assembled. Once you see these spots, you can sand and adjust before painting. This is a critical step for a durable build.
Keep your tools simple and consistent:
- Sharp nippers for clean cuts
- Hobby knife for controlled trimming
- Sanding sticks or files to level nub marks
On higher grades, sliding armor and removable panels add more areas to watch. Finding these early is what makes a build professional.
Planning masking boundaries based on actual part breaks
Pre-building shows where panels really break, so masking is easier. This keeps paint edges sharp and reduces touch-ups. It also makes panel lining more effective.
When armor layers overlap, small shifts can change what looks straight. Using the assembled silhouette as your guide helps with complex color layouts.
Reducing rework by confirming articulation range prior to final coats
Articulation checks prevent surprises after varnish or topcoat. Bend elbows, rotate shoulders, and test hip swings to confirm nothing grinds through the finish. This is important for durability and appearance.
By verifying movement first, you avoid clogged panel lines and chipped corners. This protects the finish and maintains consistency in your build.
It also keeps the model looking clean for photos or display. With fewer corrections, the quality stays high from primer to final coat.
YZ Model Studio approach to custom gundam color matching on display-ready builds
YZ Model Studio was created for those who love the look of a Gundam model as much as building it. They see Custom Gundam color matching as a complete plan, not just a quick paint job. Their goal is to make a model that looks great from any angle.
They start with a pre-built Gundam model. This step helps them see how colors work together under real light. Even though parts may look good right out of the box, they often need extra details to shine.
They also check for problem areas before painting. Parts that move can rub against each other, causing damage. YZ Model Studio makes sure the model can move freely without wearing out quickly.
Choosing the right products is key for the model's long life. Some materials can be damaged by harsh chemicals. YZ Model Studio uses the best products and techniques to keep the model looking its best.
FAQ
Is custom gundam color matching more accurate after a pre-built Gundam model is assembled?
Yes. A pre-built Gundam model shows the full silhouette and armor details. It also shows inner frame tones and small accents in context. This is the most reliable “color truth” reference.